as some of you may remember, when i was home in late june, i got to do something extra specially fun: i got to see my best friend joia’s new house! those who have been following me for a while may recall that two of my closest friends are also two of the oldest: i met them in preschool. yes, pre-school! there we are below over christmas break. joia is on the left, i’m in the middle, and kim is on the right.
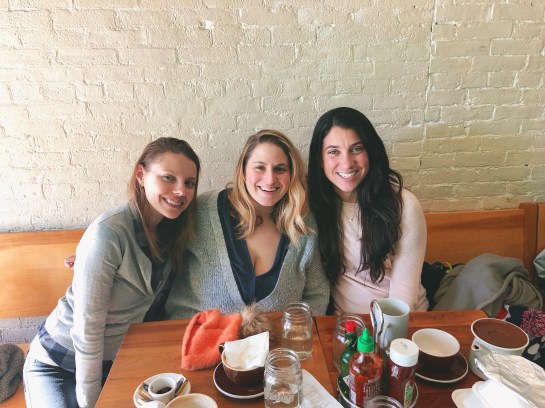
we’re all spread across the country now–me in new york, joia in our hometown (she bunked with me in new york for a year, but ultimately moved home to be with her now husband!), and kim in san francisco–but we see each other as often as we can. because we’ve been friends for so long, we’re more like sisters than anything. we’re what my high school psychology teacher liked to call “refrigerator friends”: the people who can walk into your kitchen and open the fridge and take what they like, the people for whom your home is theirs, and vice versa.

L-R: our friends kara and sophie, then joia, and me.


so you can imagine that their sadness is my sadness, and their joy is my joy. which is why i was positively OVERJOYED when i heard that joia and her husband were house-hunting. sure, it’s fun to decorate an apartment in NYC but it’s even MORE FUN to decorate an ENTIRE HOUSE. joia and her husband, who i’ll call T, recently purchased an adorable little cape home on a street located (happily) about a 4 minute drive from my parents. the house has a big back yard (they’re planning on building a great deck and a garden!) and is across from a bubbling brook; if you listen carefully, you can hear the water from their front steps. it was recently “renovated” but in flipper style, which means that some (read: most) of the finishes aren’t exactly what joia would have liked them to be–but it has a lot of potential!
joia and T didn’t want to take on a full gut job (they both work full time and it would’ve been nearly impossible, not to mention a big financial strain), but they’re happy to work on their new home little by little to take those not so great builder finishes from drab to fab. T happens to be very handy, so they’ll be able to do a lot of the work themselves.
i know joia is a bit disappointed that the home wasn’t instantly all she ever dreamed of, but let’s be honest: few homes are. i think this is the case with a lot of first-time homeowners, especially those that don’t have endless budgets (which i think is MOST PEOPLE). you start house-hunting and you think of all the “must haves” (aka, things you’d like to have). and then you realize what your actual budget can get you, and you learn to compromise, and to live with the fact that dream homes don’t happen overnight.
the bottom line is this: even if your home starts in a yucky place (i mean hello, look at what mine used to look like!), you can get it to a happy one. and that, my friends, is where i come in! joia and t don’t have an endless budget (who does), so they’ll likely be decorating little by little, over time–but i’m going to be helping her think through her design choices as they happen, and i CANNOT WAIT. like i said, when do you ever get to help with a WHOLE HOUSE?!
so, let’s look at the before pictures, shall we?! i snapped these in early june, right before joia and T moved their furniture in. i’ve got a lot of big plans in my brain for the house, starting with the living room (which i’ll share here next week!), but let’s start at the very beginning (a very good place to start).
read on for an ONSLAUGHT of photos!
first up: the kitchen. when you enter the house through the back/side door (where you’ll pretty much always enter), you see the kitchen straight ahead, and behind it, a large eat-in dining area. the appliances were recently updated, and while joia isn’t in love with the cabinets, they’re solid maple, so the plan is to work with them for now. she found some nice inspiration images that show this style and shade of wood cabinets with a pretty, light sage green paint, and is contemplating going that route, as a full kitchen reno isn’t in their future anytime soon.

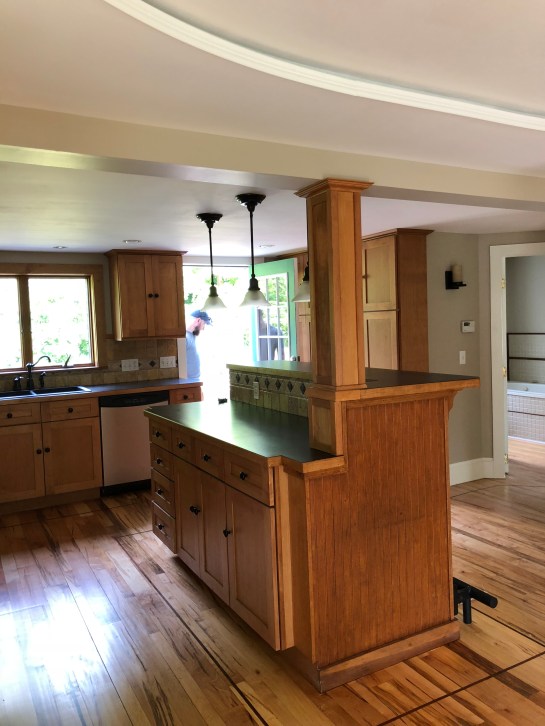
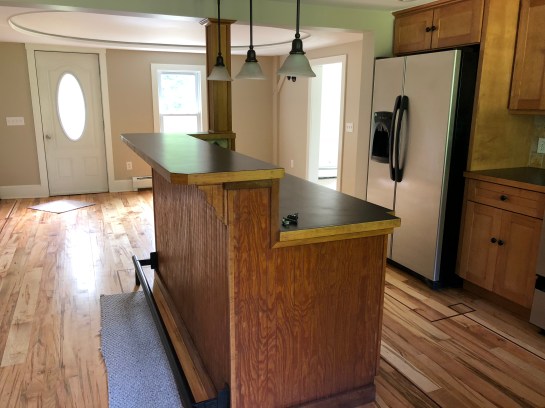
the kitchen island–we’ll likely paint it, and remove that weird foot bar.
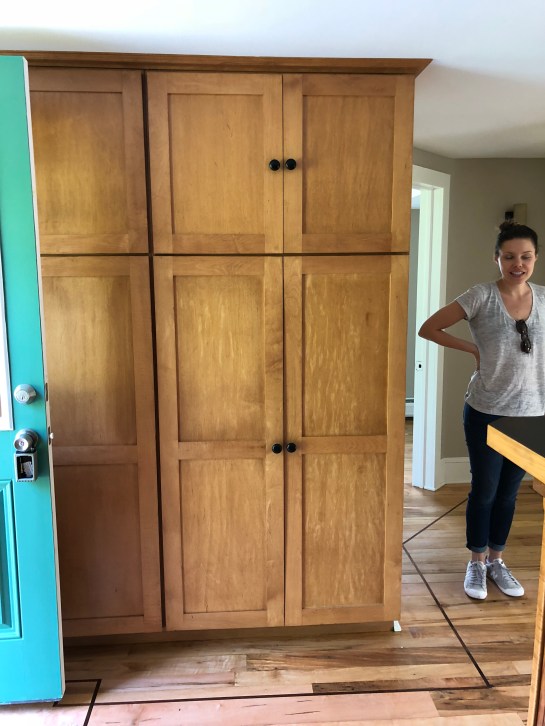
joia might kill me for the photo below, but it’s the only one i got of the (VERY SPACIOUS!) pantry. god bless non-city storage space, amiright?! here, you can also see a very weird inlay detail in the floors. joia HATES this, but short of ripping up or re-staining all the wood floors, there’s no way around it. this is why god invented area rugs. behind her is a downstairs bath (with soaking tub! odd choice but hey, a tub is a tub!) and off to the right, a small bedroom that T will use for his office (he works from home a few days a week).
here’s a better shot of the kitchen. i for one am really excited to take this on as a design challenge, as i think this kitchen is PRETTY CLOSE to a lot of suburban kitchens out there: microwave over the stove, mid-range stainless steel appliances, oak (or maple) cabinets, odd mediterranean-esque beige backsplash tile…there’s lots to not love, but also, lots of potential for not a lot of dough. more to come on the kitchen plan later, but my first recommendation here will be to rip out the backsplash and replace it with classic white subway tile. if i have my druthers, i’ll also have them redo the counters, but that’s likely a project that can’t be done right away.

kitchen cabinets and appliances
here’s the kitchen as seen from the large dining area. we’re not in love with what’s going on with that weird ceiling treatment (the living room has it too; we think it hides the electrical for the recessed lighting), but like i said above, such is life with a first home. you can’t win ’em all!
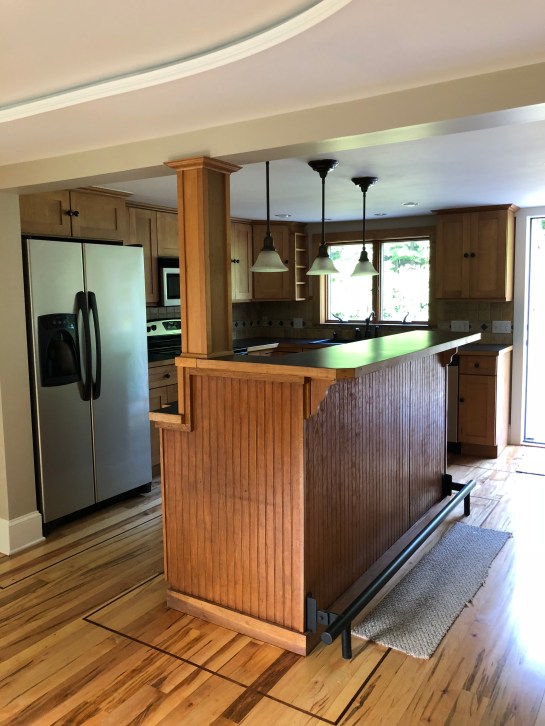
i’d like to help them select new schoolhouse-style pendants for over the kitchen island, and again, i’m going to advocate that they paint that baby (maybe a deeper green or a simple, clean white?). here you can see that the weird backsplash goes all the way around. but there’s LOTS of good here: new appliances, a sink that overlooks a window into the dreamy backyard, good light, loooots of storage, and plenty of counter space.
here’s the dining area. i’m picturing a nice round pedestal table here, maybe with white windsor chairs? and perhaps wiring in a chandelier to draw the eye up. obviously, the odd sconces will likely go.


more weird sconces. bye bye, sconces.
the above photo gives you a better sense of the layout (i’m standing in the dining area) in terms of front door/pantry/island, etc. it’s really quite spacious for a relatively small house (i think it’s around 1500-1700 square feet).
from here, you can also get a sneak peek into the tub in the downstairs bath–with soaking tub (more pictures if you scroll down!).
here’s the full view of the eating area. the placement of the front door will limit them a bit in terms of table size, but it’s larger than it looks. i’m also thinking that some nice built-in bench seating could work with a more oval table, but i need to get in there and measure out the space. i know T could build benches in a hot second, and then we’d just need to get some cushions made to cozy it up a bit. i can see it!
eating area, as seen from the kitchen. they’re getting a new front door.

see what i mean? plenty of space!

insert cute dining nook here
okay, moving on. this is the downstairs bathroom, which, oddly, has both a stand up shower and a soaking tub. it’s a spacious room, and someday, when joia and T have budget, they can really make this space shine, but in the interim, it’ll likely be cosmetic fixes to make it work for them right now.
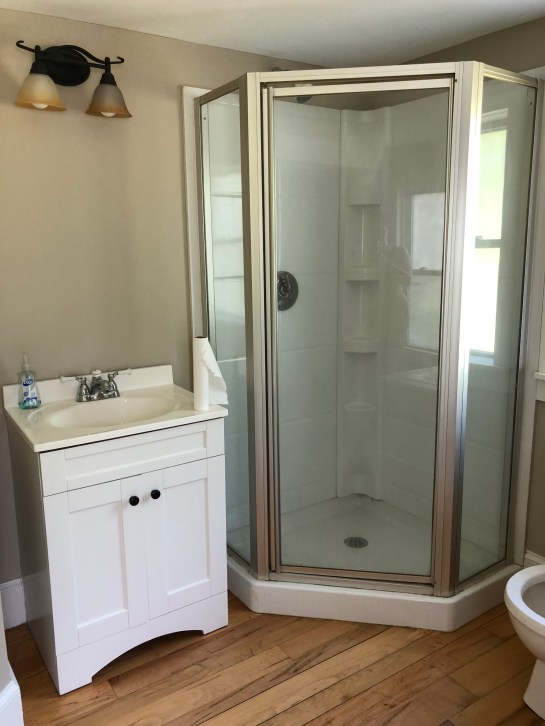
obviously, this space needs a mirror, and new lighting would be ideal.
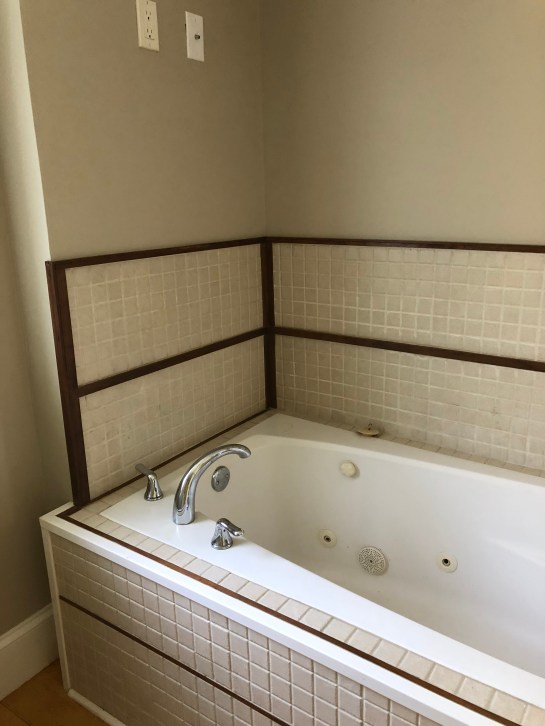
here’s where it gets a bit strange. soaking tub: yay! weird beige tile + red wood: NAY. some odd choices were clearly made in this room, so for now, joia’s plan is to paint the wood strips below white, and just make the best of it. a soaking tub is a soaking tub, no matter what it looks like.
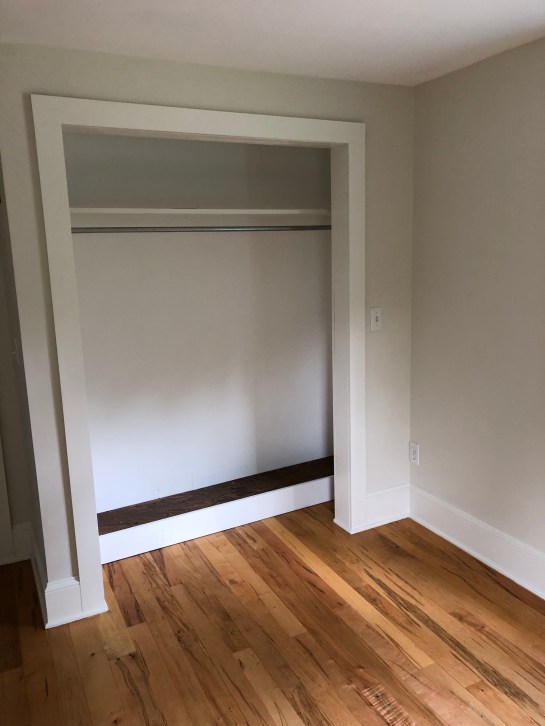
 opposite the entrance to the bathroom is a third bedroom that’s actually quite a nice size. it has two windows—one that overlooks the driveway/side of house, and one that looks out on the front yard. in the back of the room is this large closet, which joia and T are going to build out with lots of useful shelving. hooray for storage space! someday, they’ll get doors made, but for now, they may just find some cute curtains to hide what’s behind.
 below is the front of the room. that boob light has to go, but that’s an easy fix. this room has really nice hardwoods, great light, and will make the perfect office for T on his work from home days.


here’s where T will put his ginormous L-shaped desk. this window looks out on the driveway.
okay, now for the fun part: the living room. the living room has the same odd ceiling situation as the dining area, which joia and T will replace someday, but not right away. so for now, it’s about drawing the eyes up via high-hung curtains, and making the space feel at once light and airy, and homey and cozy. i’ll be sharing a full design plan for the living room (at least, my dream design plan!) next week, but let’s talk about the basics.
the photo below was snapped in the living room, looking into the eating area. so, through that door is where i’d love to put the little L-shaped bench/table situation.
 the area below is getting the biggest facelift, because that, folks, is a faux fireplace. as of today, it’s already been torn out and covered up with drywall (more to come on that next week with the living room design plan), with room left in the middle for built-in shelving to store TV consoles, cable boxes and the like. above it, joia and T plan to mount the TV (T has to watch his sports, joia has to watch her friends reruns).
 here’s the back right corner of the living room, otherwise known as sectional city. that’s right, there’s a giiiiiant sectional going right here. it’s unclear what the homeowners were thinking with the little round window, but we’ll chalk it up to 1940s charm.
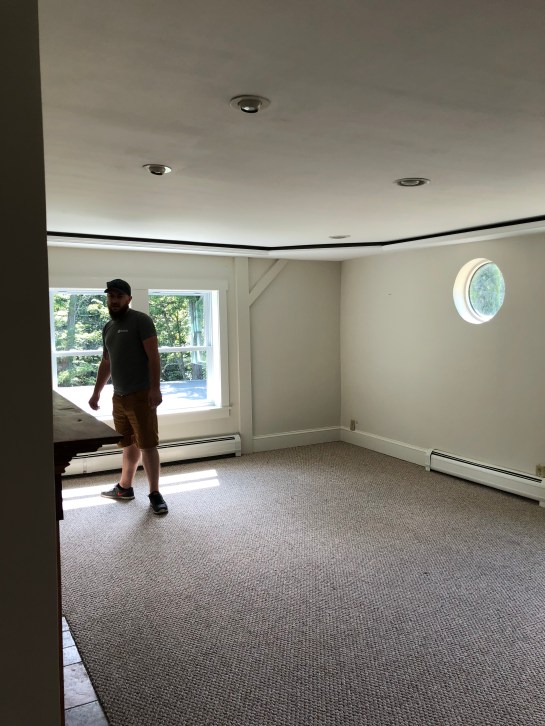
hey, it’s T!
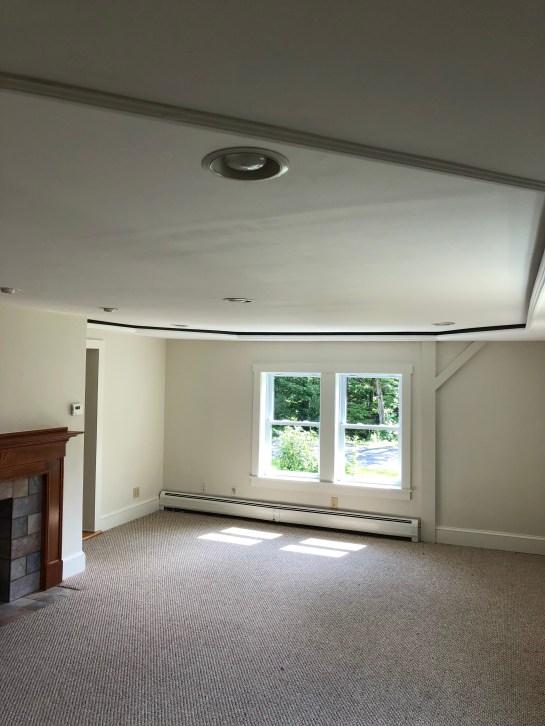
the light in this room is truly lovely–and the space is BIG.
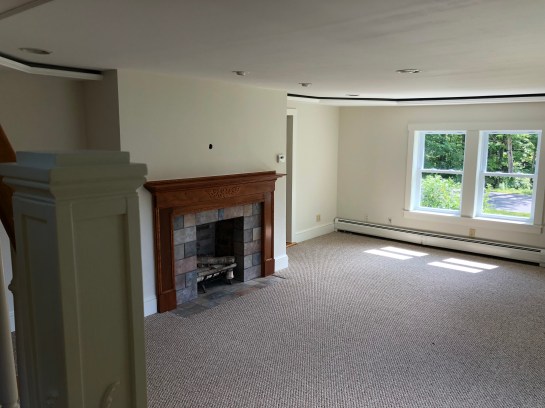
here’s the (almost) full room snapped from the stairs. picture that fireplace gonzo and you can really see how the space will come together.
ok, friends, that’s all for now. i’m saving the upstairs for the next post, mostly because i’ve typed 2300 words and i can’t imagine any of you have even made it this far. i don’t want you keeling over at the keyboard. or myself, for that matter.
anywho, if you were one of the lucky/wonderful few to make it to the end, i’d love if you’d weigh in with any questions/comments/thoughts, and even better, if you’d tell me whether you’d be interested in hearing/seeing more about the design process as it unfolds!
this is a real life home, a real life, budget-friendly process, and i think it’ll be cool to chronicle how regular folk design their homes (without endless budget and endless time). i’m so thrilled to be helping them pick stuff out (even if my design boards don’t come to fruition for years!), and i hope you’re thrilled to come along for the ride.